Wednesday 22 December 2010

Macarons, The First Encounter


Macarons. They are the temperamental diva's of the baking world. Like Everest to mountaineers! Like the Doldrums to sailors! Like sand through the hourglass! No wait, scrap that last one. Macarons are the mythical unicorn of the blogosphere at the moment, fickle little pastries that require the perfect circumstances in order to come out just right.

My first encounter with the macaron was when the boyfriend and I were at the end of our study exchange and we were spending the last few weeks traveling. We were in Paris during a chilly November where we stayed in a youth hostel in Bastille. The room's heater was faulty and was always on full blast, we went from almost freezing outside to sweating madly the moment we stepped into the room. In the mornings we got chewy rolls and jam for breakfast and some coffee to wash it down with. After breakfast on our way to the train station we had to walk past a bakery which is where I had my first taste of macaron. I can't remember what flavours we had, or how much it cost, but I can remember the texture. The shell was just firm enough to hold the macaron together, giving way to a soft interior when bitten into. The filling blended seamlessly with the soft interior filling my mouth with the most wonderful sensation. After that one taste I was hooked. No mediocre macarons would ever appease my taste buds! From then on I required perfection!

This week I was baking Christmas cookies when I suddenly realised that I would have a few leftover egg whites, and that they would be about 2 days old when my cookie baking was over. "Should I try it?", I wondered. With my impending working career looming on the near horizon I threw caution to the wind and decided, the time is now! With the ingredients bought I placed everything that I needed at arms length, ready to be used the instant it was needed. I carefully weighed out all the ingredients in little bowls (and felt very TV chef-esque). As I started beating the egg whites I had a horrible realisation; the very plastic bowl that the egg whites were in was brim-full of cookie dough yesterday, buttery oily cookie dough. My heart sank even further as my egg whites failed to puff up and just lay in a sorry pool in the bottom of the bowl.

Panic mode kicked in, I remembered reading somewhere that egg whites can be aged by microwaving them for about 10 seconds. A quick google search confirmed this and soon enough I was on my way to beating wonderful fluffy egg whites in a meticulously clean glass bowl. The rest of the macaron making process proceeded smoothly with only a minor flaring of tempers when a certain family member of mine started sticking his fingers into my delicate macaron batter (oh the horror!).


Right at this very moment I made my first mistake. With no silicone baking sheet or parchment paper in sight, I piped my macarons on to an ungreased sheet of tinfoil. I know I know, hindsight man, the recklessness of youth, blah blah blah. I've learned from my mistake! After losing almost all my macs' insides I learned!

After piping the batter I left the mac shells to harden a bit, no problem. I heated the oven to 150degreesC, inserted the first batch after resting for 40 minutes and then I waited. I watched that batch like a hawk. After the 16 minutes baking time was up I dutifully removed them and tried to remove one but got only the shell on my hand, the foot was still stuck to the foil. "No problemo", I said (in my head), "I will simply bake them a bit longer". Well I baked them for another minute, then 2 more minutes, then another 2 more minutes upon which I finally declared, "These macs must be ready!" (they weren't ready).

With the one batch out I inserted the next batch, adjusted my kitchen timer for 5 minutes longer than the recipe stated and then I promptly got distracted. Ladies and gentleman, meet mistake number 2. When I smelt the toasty smell of almonds I knew that I was in trouble. When I got to the oven a batch of toasty brown macs greeted me with horribly split tops and no feet. :(
So I had to learn the hard way that my oven's temperature was not as consistant and even as I previously believed. I also learned that macarons should be watched and that I should stay away from the Internet if I do not want to be distracted.


At this moment the story sounds pretty dire, bleak, with a macaronless future. But fear not, all was not lost! While all the insides stayed behind on the foil of one batch, and the other batch turned out toasted and very unmacaron like, they still tasted good! I filled them with chocolate ganache and sandwiched them together and they still turned out pretty tasty! Not very pretty, not like Parisian macarons, but not bad either.

My future definitely holds more forays into the black magic that is making macarons. I have not abandoned hope! I will learn from my mistakes and try again (but this time after a trip to the store to buy a proper baking sheet and perhaps an oven thermometer...)

Post Script: The background color of the images were changed in photoshop for higher visibility and just for the fun. When my macarons are of a higher quality I'll post prettier pictures!

Thursday 2 December 2010

Babyshower Cake and a long overdue post


As you might have noticed, it's been pretty quiet here on the blog since September. I have been neglecting my blog for the past few months, but I promise that it was for a good reason! Yesterday I finally handed in my Master's thesis! Yay! Unfortunately that means that I have to start job hunting, but I'll just forget about that for a little while while I'm still enjoying this new freedom from thesising...


These photos are of a baby shower cake that Grethe and I made. We made a two-layer sponge cake that was wrapped in fondant and covered with multiple pink fondant flowers.

We made extra cupcakes with the cake.


And coloured the half of each layer pink for a surprise when the mother to be cut into the cake!


As usual the cat's curiosity got the better of her...


So until next time (which should not be 3 months away again *cough*), adieu!

Wednesday 15 September 2010

Nectarine Parcels


Phew, last post, last minute! Thank you LadyRaven for hosting the Ready Steady Cook! challenge, it definitely was a challenge to finish it all on time (due to my laziness...), but it was a learning experience.

readysteadycook

This dessert is quick and dirty, no measuring of ingredients, just add to taste..!

Nectarine Parcels


  • Nectarines, cut into slivers
  • Butter
  • Sugar
  • Cinnamon
  • Mixed Spice
  • Lemon Zest
  • Phyllo Pastry


  1. Melt the butter and sugar in a pan. Add the nectarines and cook for about 10 minutes.
  2. Add the spices and lemon zest, cook for a few minutes more and remove from heat.
  3. Cut phyllo pastry into 10cm wide strips. Place about 5 strips on top of each other.
  4. Place some nectarines on one of the corner areas. Fold the corner over to the opposite side to form a triangle. Keep on folding triangles until you have reached the end of the strip. Brush the edge with butter to seal the triangle.
  5. Bake in a preheated oven at 180 degrees Celsius until the pastry is golden brown.

Tuesday 14 September 2010

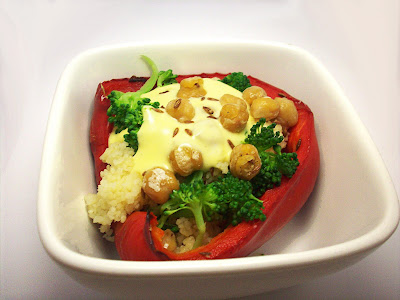
Filled Red Pepper with Hollandaise Sauce


In my mind the 15th of September was on a Friday (I soon realised that it was actually a Wednesday). This date is significant because it is the deadline for entries for the Ready Steady Cook! challenge. Why did I fly into a panic when I realised that the 15th of September was tomorrow? It is because up until that point I had only finished my starter entry. This blog post will probably hold the record for the fastest turnover time between cooking and blogging, there's nothing like a deadline to get me moving!

readysteadycook

I had my reservations about how successful this course would be, but the pronounced silence when my boyfriend started eating soon quelled any fears I had! This is the first time that I have made hollandaise sauce, despite my fears of ending up with pieces of lumpy egg it came out great; smooth, creamy, lemony and oh so tasty!

Check out my first post to see what this Ready Steady Cook is all about: Red Pepper Walnut Dip with Naan Bread


Hollandaise Sauce

  • 3 egg yolks
  • 150ml butter
  • Juice of 1-1.5 lemons
  • Salt to taste


  1. Place egg yolks, salt and lemon juice in a blender. Blend for 1 minute.
  2. Heat butter until very hot (the butter is going to cook the eggs).
  3. With the blender running very slowly pour in the butter.
  4. Continue blending for about a minute, then it's done!


Couscous and Broccoli filled Red Pepper with Chickpeas
Serves 2

  • 1 Large Red Pepper
  • 3/4 cup Couscous, uncooked
  • 0.5 Broccoli head
  • 0.5 tin Chickpeas, drained
  • 2 teaspoons Cumin


  1. Cut red pepper in half, place on a baking tray and bake for 20 minutes at 180 degrees Celsius or until soft.
  2. Meanwhile heat a splash of oil in a pan. Add cumin and fry for a minute. Add the couscous and fry for 5 minutes.
  3. Prepare the couscous according to the instructions on the packet.
  4. Steam broccoli until just cooked.
  5. Assemble and serve with the hollandaise sauce!

Sunday 5 September 2010

Red Pepper Walnut Dip with Naan Bread


This is my starter course for the Ready Steady Cook! challenge hosted by LadyRaven from Add To Taste. How does this challenge work? Each blogger thinks up a list of 7 ingredients for another participating blogger. You have to create a 3 course meal with your ingredients as well as the allowed pantry ingredients. I got assigned the following ingredients from Ayeesha from Taste of Pearl City:


readysteadycook

  • Couscous
  • Chickpeas
  • Red Pepper
  • Broccoli
  • Walnuts
  • Filo pastry
  • Nectarines


So first thing I thought when I saw the chickpeas was "Yay, hummus!", but then I realised that tahini isn't one of the pantry ingredients, boo. "But wait", I thought, "tahini adds a nutty taste and I've got nuts man, walnuts!". So the hummus was back on, although I'll rather go with calling it a dip as it is rapidly straying from traditional hummus territory.

I decided to serve it with naan bread because I've wanted to try my hand at making it for a while now. Alas, another obstacle was in my way, after making the naan and taking photos I realised that I had used *gasp* a disallowed ingredient! Since baking powder isn't one of the pantry ingredients, I made the recipe again with self raising flour instead of bread flour and I am happy to say that it came out just as well. So with a clean conscience I can now present the recipes for Red Pepper Walnut Dip with Naan Bread!


Red Pepper Walnut Dip

  • 1 can of Chickpeas, drained
  • 1 large Red Pepper
  • 50g Walnuts
  • 2-3 Garlic Cloves
  • Juice of 1 Lemon
  • Salt, Pepper and Cumin to taste


  1. Cut the red pepper into segments, roast in the oven until soft and cooked.
  2. Roast walnuts under the oven grill for a few minutes.
  3. Put the walnuts in a blender, blend until fine.
  4. Add the rest of the ingredients and blend until smooth. Extra oil can be added if the mixture is too firm.


Naan Bread
Makes about 10 thin breads

  • 3,5 cups Self Raising Flour
  • 1.5 Tablespoon Sugar
  • 2 Teaspoons Salt
  • 1 cup Milk, warmed
  • 60ml Oil
  • Melted butter for brushing the dough (keep for later)

Note: If using bread flour, add 1 teaspoon baking powder.

  1. Mix the dry ingredients together.
  2. Add the wet ingredients and knead for 10 minutes.
  3. Cover the dough and leave to rise for 1 hour.
  4. Break off golf ball size pieces and roll out very thin into elongated oval shapes (some refer to this as teardrop shaped).
  5. Brush the dough with melted butter and bake in a preheated oven at 200 degrees Celsius for about 2 minutes or until golden brown.

Thursday 5 August 2010

Gingered Turkish Apricot and Camembert Tart


Fairview has recently launched a competition for food bloggers to create a recipe with Fairview Camembert; this is my entry!

I got a couple of recipe ideas from browsing the Internet but in the end this tart was wholly my brain child. I first tried to make little individual pies but it didn't look (or taste!) as good as this open tart.


The final product was pretty damn tasty if I say so myself. The sweetness of the baked apricots go well with the creaminess of the cheese, the ginger biscuits add a nice spicy crunch while the honey just brings all the flavours together. The tart would make a nice sweet addition to a cheese platter and I am proud to present it for the Fairview Camembert Competition!


If you would like to vote for my recipe, head over to the competition page over here and select number 6 in the poll on the right hand side of the page.


Gingered Turkish Apricot and Camembert Tart
Makes 4 triangles

  • 1 15cm x 15cm sheet of Puff Pastry
  • 10 Turkish Apricots
  • 0.5 Wheel of Camembert
  • 4 Ginger Cookies
  • Honey
  • 1 egg for brushing the pastry


  1. Preheat the oven to 150 degrees Celsius.
  2. Roll out the puff pastry slightly on a floured surface. Put the pastry dough on a tinfoil lined oven pan.
  3. With a knife draw a 1cm border around the pastry (be careful not to cut through!).
  4. Cut the apricot length-wise, pack them so that they overlap slightly on the pastry within the border.
  5. Place about 1cm thick slices of Camembert on top of the apricots.
  6. Brush the pastry border with beaten egg and bake for 25 minutes.
  7. Break the ginger cookies into small pieces and sprinkle over the tart after it has been in the oven for 25 minutes.
  8. Place the tart back into the oven and grill it for a few minutes. (Keep your eyes on the tart in this step, it burns very quickly!)
  9. Generously drizzle honey over the tart, cut into triangles and serve.

My cheese slices in the photos were a bit thin, I corrected it in the recipe.


Thursday 22 July 2010

Sticky Balsamic Reduction Tomato Relish


The first time I heard of Verlaque was at the South African Food Bloggers Conference earlier this year where I received one of their products in my goody bag. I've posted about using Verlaque products on my blog before(Rasberry Balsamic Roasted Butternut) and I will probably post again, but today is a special post. Verlaque is having a competition to see who can come up with the tastiest original recipe using one of the products from the "Balsamic Reduction" range.


I came up with this tomato relish just a few days before the challenge was posted (just in time). I was having dinner at my mother's house, we planned on making salad but when we got home from the shop the baby tomatoes we bought were so bland and flavourless that they just wouldn't cut it in a salad. And so my recipe was born...

My mother was very sceptical when she saw how much balsamic vinegar I added to the tomatoes but after she tasted it she was an instant fan! She even got all enthusiastic about buying salad stuff for when I made the relish again with the Verlaque Balsamic Reduction!


Enough about my family, by now you must be wondering what flavour I used? Originally I wanted to use the Fynbos/Wild Flower Honey Balsamic Reduction but unfortunately I couldn't find any in the Woolworths stores near my home. Second choice was the Sundried Turkish Figs Balsamic Reduction which I luckily did find in store (but in all honesty, I think you can use any flavour that tickles your fancy). The fig flavour turned out pretty tasty, especially when I served it with blue cheese and glazed figs on some rocket leaves. The tomato relish would also work nicely on some bread, perhaps with some cheese and...let me rather stop there and let your imagination dream up the ideal accompaniment to this tomato concoction!


Sticky Balsamic Reduction Tomato Relish
Serves 2 as a salad topping

  • 17 Baby Tomatoes (more or less)
  • 50ml Balsamic Vinegar
  • 25ml Verlaque Sundried Turkish Figs Balsamic Reduction
  • 25ml Chutney
  • Salt and Pepper to taste


  1. Cut the tomatoes in half, place cut side down in a pan.
  2. Mix the rest of the ingredients together and pour over the tomatoes.
  3. Simmer on a medium heat. Don't stir the tomatoes while cooking, just move them around from time to time so that they don't stick to your pan and that they stay intact. Your relish is done when the tomatoes are cooked through and the sauce had become nice and sticky.

Thursday 8 July 2010

Meaty Slow Cooker Bean Soup


I made this bean soup for a challenge at the Kleine Zalze For The Love Of Wine website. The soup is very economical, the beans and the eisbein cost me about R40 and the soup was enough for 8 hungry students!

Meaty Bean Slow cooker Soup
Serves 8 hungry male students


  • 2 Packets Red Speckled Sugar Beans
  • 1 Smoked Eisbein
  • 2 Mutton Stock Cubes


  1. Put the beans in a pot. Add water to the pot until the beans are covered with at least 5cm of water. Soak overnight.
  2. Drain the beans and put them in a slow cooker with the eisbein.
  3. Add enough water to cover the beans and the eisbein.
  4. Put the slow cooker on auto and let it cook for at least 8 hours.
  5. When the beans are soft add the stock cubes and salt to taste. At this stage I like to mash some beans so that the soup becomes a bit thicker.
  6. Remove the eisbein bone from the soup and serve.

Sunday 4 July 2010

Homemade Chive and Peppadew Cheese: JessiKaas!


Homemade cheese! And it tastes good! I feel so chuffed with myself! Okay, enough exclamation marks already. Making cheese sounds hard, people look at you in awe upon hearing that the tasty cheese is your own creation but really the process is quite simple; all that you need is a little bit of patience and something heavy. (The patience is for waiting while the milk boils and the curds drain and the heavy object is to compress the curds to get all the whey out.) The cheese has the texture of cream cheese, it is tasty spread on bread and a great conversation topic in a crowd!

For the non-Afrikaans readers, "kaas" is Afrikaans for "cheese", and my name is Jessica so I cleverly combined the two to create JessiKaas! (Creative genius am I right? Right? Yes I'm here all week folks. *ba da dum*)


Homemade Chive and Peppadew Cheese aka JessiKaas
Makes about 1 cup of cheese

  • 1 litre Full Cream Milk
  • 250ml Buttermilk
  • Chopped Chives to taste
  • Chopped Peppadews to taste
  • Salt (plain or flavoured) to taste
  • Cheesecloth


  1. Heat the milk in a saucepan until it just starts boiling.
  2. Remove from the heat and stir in the buttermilk. White clumps should start forming, this is the curds. The liquid is the whey, it should become clearer as more curds form.
  3. Leave for about 10 minutes for the curds and whey to fully separate.
  4. Line a colander with cheesecloth and pour in the curds and whey. Rinse the curds with water for a few minutes to remove all of the whey.
  5. Knot the cheesecloth with the curds and place under a heavy object for an hour. I placed the cheesecloth under a cutting board and weighed it down with a box containing six full wine bottles for this step.
  6. Remove the curds and place in a mixing bowl. Work the curds (knead) with your hands until the texture changes from rubbery to creamy and smooth. This takes about 5 minutes.
  7. Add flavoring to taste, place the cheese in an airtight container and refrigerate.

Tuesday 8 June 2010

Sticky Condensed Milk and Vanilla Seed Icing


In my opinion condensed milk is just about the best thing that comes out of a can. If you need some to disappear I'm the person you should go to... So when Marisa from The Creative Pot tweeted about condensed milk cupcakes the cogs started rolling and I came up with this icing. Let me tell you, if you don't like sweet things you should stay away from this icing, it's sticky and sweet with the creamy taste of condensed milk and the light taste of vanilla to break the hold that the sugar has on you. The icing sets to a beautiful silky matt covering with the vanilla seeds dotted throughout the surface.


I built my own light box last night so that I could take proper photos. It was actually quite easy to make, I found the instructions here, I used tissue paper for the diffusing material instead of fabric. Just need to get myself a stronger light than my bedlamp!


Condensed Milk and Vanilla Seed Icing
Enough for approximately 10 cupcakes

  • 250g Icing Sugar
  • 70g Butter
  • 100ml Condensed Milk
  • Seeds of one Vanilla Pod


  1. Mix together the butter and condensed milk.
  2. Beat in the icing sugar.
  3. Add the seeds and mix well.


I heated the icing a little bit before piping it on the cupcakes. It spreads quite a bit so there is no making impressive icing towers with this one.

Tuesday 1 June 2010

Wedding Cake Decorating Trials


My friend and I have a thing, a cake baking and decorating thing. We studied engineering together and we both love baking. Every once in a while (usually around birthdays) we give in to our urges and bake themed cakes. We started with decorating cakes with buttercream icing with props and sweets and things on top then moved on to experimenting with fondant cake covering and fondant decorations.


Recently one of our friends that got engaged asked us to make their wedding cake! First thoughts were "Yay, they asked us, wow!", second thoughts were "Oh crap, can we realy make a cake worthy of being called a wedding cake?". A trail run for wedding cake designs was in order. The color scheme for the wedding is white, blue and silver, we tried out a few things but the cake and cupcakes pictured won in the end. We also tried our hand at wrapping a cake with chocolate. The cake came out pretty well, just have to spread the chocolate a bit thinner next time! (the canned fruit was a last minute substitute as we realized we didn't have any fresh fruits...)

So without further ado, gaze upon the cake decorating efforts of Grethe and Jessica!


The photos were taken while everyone was standing around looking at me and waiting for the cakes to be cut, not ideal conditions but oh well!

Thursday 13 May 2010

Home-made Hummus


At the South African Food Blogging Conference in March Jeanne Horak-Druiff from Cooksister spoke about finding your blogging voice. The point that really stood out for me was that there are two types of food bloggers; a writer that likes to cook or a cook that likes to write. The more I blog the more apparent it is that I am definitely the latter (pfft, not like I didn't know that already..!).

I started blogging in the first place because I wanted all my recipes in one place, blogging made more sense in terms of data security (my laptop can fail or get stolen; blogger.com has backup servers to prevent content loss). Also, if the recipes are on the internet they are easily accessible from almost anywhere.

The second reason why I started blogging is completely unrelated to food or cooking; I am currently busy with a Masters degree which means that thesis writing looms on the immediate horizon. The main focus of Engineering really isn't on stimulating creative writing skills; I've found that a 4 year degree is really effective in undoing a lot of writing experience gained at school. In writing just like any other skill, practice makes perfect. Writing does not come easy to me so the blog is my way of practicing making the words flow easier.

Phew, enough of super long personal exposé! This is what happens when I wake up inexplicably at 1am...


My inspiration for making hummus came from the Beetroot Hummus post by Nina from My-Easy-Cooking. I never realised that it is so easy to make this super tasty spread/dip! Luckily my mom had a pot of tahini paste lying around (that stuff is expensive!); the tahini really plays a large role in the taste of your final product. For those who have never heard of tahini paste (I only found out about it recently), a quick Google search defines it as "a paste of ground sesame seeds and a flavour similar to peanut butter.".

Cooking to me is a very 'free-range' compared to baking; baking requires precision but with cooking I usually stick my fingers in stuff and taste and adjust the food until I am happy with the taste! For the hummus I suggest using my recipe as a guideline, at the end of the day you have to eat it so modify it until you like it.

In the photos I served the hummus on some fresh ciabata with roasted tomatoes marinated in oil that I bought at the Cheese Festival. Very tasty!

Hummus
Makes about 500ml of hummus

  • 1 can of chickpeas, washed and drained
  • 2 tablespoons Tahini paste
  • Juice of 1 lemon
  • 1 clove of garlic
  • Plain yoghurt
  • Salt and pepper to taste
  • Optional: Cumin seeds


  1. Put the chickpeas, tahini, garlic and half of the lemon juice in a blender and blend until smooth.
  2. Add yoghurt to thin out the mixture (other recipes call for oil here).
  3. Add spices and lemon juice to taste.
  4. No more, it's that easy!

Thursday 6 May 2010

Easy Broccoli Soup


Winter has arrived in Stellenbosch! The cold weather made me long for soup the whole day, the only question was whether I would make broccoli or butternut soup. Clearly broccoli won, but butternut soup can be made exactly the same way by just substituting the butternut for the broccoli.


Easy Broccoli Soup
Serves a lot, at least 4 ravenous people

  • 2 Broccoli heads, broken into small florets
  • 1 large Onion, chopped
  • 2 Chicken Stock cubes
  • Milk for thinning


  1. In a large pot fry the onions until soft.
  2. Put the broccoli and stock cubes in the pot, add enough water to cover about half of the broccoli and bring to a simmer.
  3. When the broccoli is soft, put everything in a blender until the mixture is smooth.
  4. Return the mixture to the pot, add milk until the desired consistency is reached.
  5. Cook for a few minutes, add salt and pepper to taste and enjoy!

Tuesday 20 April 2010

Rainbow Sponge Cake


One of my friends recently returned home after living in Germany for 7 months, this event called for special cake! This cake was inspired by photos doing the rounds on the Internet of a rainbow cake that is made with all the colours of the rainbow layered in one batch. The idea is to make the outside of the cake very plain, then when you cut into the cake you are surprised with an explosion of colour!

The very vivid colours are achieved by using gel food colouring that can be found at speciality baking stores. I used a recipe for sponge cake that I found here.

Rainbow Sponge Cake
Recipe for one large square layer or two smaller round layers

  • 3 eggs, separated
  • 15ml Lemon juice
  • 140g White sugar
  • 25ml Warm water
  • 140g Cake flour
  • 5ml Baking powder
  • Pinch of salt


  1. Preheat the oven to 180 degrees Celsius.
  2. Beat egg whites until stiff. Beat in the lemon juice and half of the sugar.
  3. Beat the egg yolks and water together. Slowly add the rest of the sugar while beating.
  4. Fold the egg yolks into the egg whites.
  5. Sift together dry ingredients and fold into the egg mixture.
  6. Pour into two greased 23cm diameter cake tins or one 30cm x 30cm square pan.
  7. Bake for 30 minutes.


To make the rainbow layers, divide the egg yolk, egg white and flour mixtures. Colour the two separate egg yolk mixes and then proceeded with the rest of the instructions for each colour. When the batters are finished, spread the one colour in the pan first then carefully spread the second colour on top.

Thursday 8 April 2010

Creamy Simonzola & Mushroom Chicken on Butternut Mash


Recently I was lucky enough to attend the Simonsberg Day Out at Diemersdal wine estate. We started off by tasting the range of cheese that Simonsberg has to offer then we moved on to the kitchen where chef Nic van Wyk prepared some impressive dishes that incorporated Simonsberg cheese. As a parting gift we received a few cheeses to take home as well as a beautiful apron (which have both been put to good use!).


I must admit that I am not a lover of blue cheese, or rather I wasn't until I tasted Simonzola. This creamy cheese might just be my gateway blue cheese! In this dish I melted the cheese into a white sauce with some mushrooms, the flavours complemented each other very well even if I do say so myself. So without further ado, here is the recipe for my cheesy creation!

Creamy Simonzola & Mushroom Chicken on Butternut Mash
Serves 2 hungry people


  • 30ml Flour
  • 30ml Butter
  • 250ml Milk, warm
  • 30g Simonzola cheese (quarter of the triangle)
  • 125g Button Mushrooms, chopped (half a punnet)
  • 4 Chicken breasts, cooked
  • 1 Purple Onion, cooked
  • Equal amounts of potato and butternut, cooked
  • Butter, milk and salt to taste


For the sauce:

  1. Melt the butter in a saucepan.
  2. Add the flour to the melted butter, mix until well incorporated.
  3. Heat the mixture, whisk in the milk slowly and let the sauce thicken.
  4. Add mushrooms and cheese and let the sauce simmer.


For the mash:

  1. Mash together equal amounts of butternut and potato with some butter.
  2. Add milk until a smooth consistency is reached.
  3. Add salt to taste.


Serve the chicken topped with cheese sauce and purple onions on the butternut mash. Enjoy!